Weather Station
-
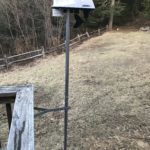
- Davis ISS 06537 and mounting kit installed on my deck.
-
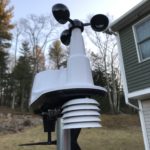
- Close up of the ISS
-
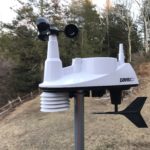
- Side shot of the ISS
-

- AmbientWeather WeatherBridge Pro control module
Homelab Weather Station Weathering the options
As an IT guy, I like metrics and graphs. I like knowing how things are performing. I’ve also always been a bit fascinated by the weather. So naturally I decided to put two and two together and built my own weather station setup. I live out in a rural area and we can get rather high winds and lots of rain at times. This project really started because I wanted to know just how fast the wind would whip through our property.
Data Acquisition
As a techie person, I really wasn’t looking for an out-of-the-box solution. I wanted something a bit more…custom. I spent a lot of time researching various different software and “controllers” for the weather station. I figured I would decided what I was going to use for data acquisition before I picked a sensor suite. I settled on the WeatherBridge Pro from Meteobridge. Not probably the most popular device out there, but I thought it was pretty neat. It lets you report to various weather sites and export the data into MySQL and other various databases. It had quite the price tag at around $450-500. I purchased this in 2015 and overall it has been ok. I do not believe I would purchase a second one. It has had…quirks.. from day one. Occasionally it will hang up and need a reboot, the screen will go silly and need a reboot or I have had it drop off the network and not respond. When it works, it works well. Boots right up and grabs the data from the ISS (below) and reports it to WeatherUnderground and CWOP.
The OS is based off OpenWRT. The web GUI also has some quirks that are more annoying then anything else. Under the services tab, if you add a service, say a MySQL database, and then decide you want to remove it, there is no way to do so.
I’ve also found the the unit itself generates quite a bit of heat and there are no fans or vents on it.
Integrated Sensor Suite
Once settling on an acquisition device, I moved on to the sensor suite. This is the piece of hardware that lives outside and actually does the leg work. I went with the Davis Weather Station 06357. This setup comes with a temperature and humidity sensor, a wind speed (anemometer) and direction vane. These sensor report back to the WeatherBridge Pro over RF at 915MHz. The unit boasts a 1000′ distance, but I have found anything further then a few hundred feet is the limit. This could be a limitation of the WeatherBridge Pro or the Davis ISS. This is a fairly basic setup, which, for what I am doing, is perfectly acceptable. I picked up the mounting hardware as well.
Davis Weather Station 06357 Integrated Sensor Suite
Ambient Weather EZ-30-12 Mounting Kit
Ambient Weather EZ-100-35M 35″ Extension
This setup is mounted to the rail on my deck. I picked this location for ease of accessibility, and the fact that I am not terribly fond of heights so my roof was off limits. It has worked well in it’s current location. I purchased the sensor suite in 2015 and it has been installed since. It has held up well to the cold weather, wind, rain etc. I have been very happy with it.
Summary
All in all, the components I picked for my weather setup have worked out pretty well and I have been relatively happy with it. You can check out the data from my station on WeatherUnderground.
Please feel free to check out some of my latest blog posts or my about me page to learn more!