
Add VLANs and Assign Ports on Cisco 2960G Switch
This post will be focusing on the Cisco 2960G Switch I acquired in my post titled “Homelab Rebuild – Part 1 – Intro“. Here I will be working on configuring the switch. This includes adding a VLAN for my WAN connection, adding ports to the VLANs and setting up a management interface.
Creating VLANs on a Cisco 2960G switch is a pretty straight forward task. You will need a Cisco WS-C2960G-8TC-
Looking to configure similar settings on a Dell switch? Take a look at my blog post titled, Add a VLAN on a Dell PowerConnect 5524p Switch for help.
Follow along with the video tutorial!
Create the VLANs
First off, we need to enter configuration mode on the Cisco 2960G Switch. To accomplish this, type: “conf t” and hit the enter key.

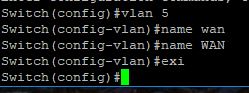
Create VLAN5 – this our WAN VLAN. Type the command “vlan 5” and hit enter. Give your VLAN a name. In my case, VLAN5 is used for my WAN connection, so I gave it the name of “WAN” – you do not have to type name twice. I goofed on the first attempt. I wanted WAN in all caps. Then type “exi” or “exit” and hit enter.
Create VLAN25 – this is our management/production VLAN. Type “vlan 25” and hit enter. Again, give your VLAN a name. Type “name Production” and hit enter. Exit VLAN 25.

Change the host name
Also, while we are in config mode, lets take a moment to setup the switch’s host name. You do this by entering the command “hostname SW-ACH-WAN” and hitting enter. You will now see the switch’s host name change.

Assigning ports
After creating our VLANs, we need to assign switch ports to them. Otherwise, they are just VLANs. You can issue the command “show vlan” and the switch will show you all of the VLANs present on the Cisco 2960G and which switch ports are assigned to which VLAN.

In the screenshot above, you can see all eight ports are assigned to VLAN 1. You can also see we’ve created VLAN 5 with the name of “WAN” and VLAN 25 with the name of “Production”.
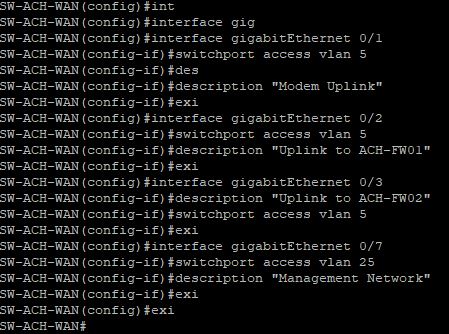
To assign ports to these VLANs, you must again enter config mode by typing “conf t” and hitting the enter key. Then, you need to enter each interface. Enter an interface by typing “interface gigabitEthernet 0/#” – Where the # is, is the port number. So, “interface gigabitEthernet 0/1” and hit enter.
Next, type “switchport access vlan 5” – this allows the switch port to access vlan 5. Then add your description by typing: description “Modem Uplink” and hitting enter. Finally, exit the interface you are working on and proceed to the next.
The table below gives a good break down of each port that I am using, what VLAN it is on and the purpose.
Switch Ports
| Switchport | VLAN | Description | Purpose |
|---|---|---|---|
| 1 | 5 | Modem Uplink | This port is where I will plug my Spectrum modem into, thus being my modem uplink on VLAN 5 |
| 2 | 5 | Uplink to ACH-FW01 | I will plug the physical NIC on HOST01 that is assigned to my firewall, ACH-FW01 into this port so that it can access the WAN connection. |
| 3 | 5 | Uplink to ACH-FW02 | I will plug the physical NIC on HOST02 that is assigned to my firewall, ACH-FW02 into this port so that it can access the WAN connection. |
| 7 | 25 | Management Network | This will connect the switch to my Dell switch stack so that I can manage the WAN switch from my production network, VLAN25. |
Management VLAN
Since we are using VLAN 25 to access our management network, we need to assign it an IP Address. We do this by entering the VLAN as an interface. So, enter the command “interface vlan 25” and hit enter. You will now be in the interface config mode. Next, type the command “ip address 192.168.25.4 255.255.255.0” and hit enter. Be sure to use your IP addressing scheme for your management network. The 255.255.255.0 is a /24 subnet mask.

Saving the configuration
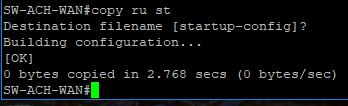
Now that we have configured our switch, it is time to save your running config. If you do not save the running configuration, all of the changes will be lost when you reboot the switch. To save the config, type “copy run start” and hit enter.
Summary
Some good reference reading can be found right from the manufacturer, in this case it is Cisco. You can check out this article regarding VLAN configuration on the Cisco 2960G switch.
Please feel free to check out some of my latest blog posts or my about me page to learn more!